01/12/2008

How to remove Antivirus 2009

The antivirus 2009 is a nasty virus and a more recent version of Antivirus 2008. Like its predecessor it will slow your system, cause unwanted popup windows
Don't waste your time with other methods of removal - they just don't work, and even the novice computer user can use this simple step by step method to remove the threat and avoid further infection through so called removal programs like Spy Hunter which just add to your infection troubles by adding their own spyware to your system.

Antivirus 2009 Removal Instructions

Search and kill the following processes
Antivirus2009.exe, av2009.exe

Remove Antivirus2009 files & dlls files

%UserProfile%\Desktop\Antivirus 2009.lnk
%UserProfile%\Application Data\Microsoft\Internet Explorer\Quick Launch\Antivirus 2009.lnk
%UserProfile%\Local Settings\Temporary Internet Files\Content.IE5\S96PZM7V\winsrc[1].dll
%UserProfile%\Start Menu\Antivirus 2009
%UserProfile%\Start Menu\Antivirus 2009\Antivirus 2009.lnk
%UserProfile%\Start Menu\Antivirus 2009\Uninstall Antivirus 2009.lnk
c:\Program Files\Antivirus 2009
c:\Program Files\Antivirus 2009\av2009.exe
c:\WINDOWS\system32\ieupdates.exe
c:\WINDOWS\system32\scui.cpl
c:\WINDOWS\system32\winsrc.dll

Remove/Modify corrupt Registry Entries

HKEY_CURRENT_USER\Software\Antivirus
HKEY_LOCAL_MACHINE\SOFTWARE\Antivirus
HKEY_CURRENT_USER\Software\Microsoft\Windows\CurrentVersion\Run\
”Antivirus” = “%ProgramFiles%\Antivirus 2009\Antvrs.exe”
HKEY_CURRENT_USER\Software\75319611769193918898704537500611
HKEY_CLASSES_ROOT\CLSID\{037C7B8A-151A-49E6-BAED-CC05FCB50328}
HKEY_LOCAL_MACHINE\SOFTWARE\Microsoft\Windows\CurrentVersion\Explorer\Browser Helper Objects\{037C7B8A-151A-49E6-BAED-CC05FCB50328}
HKEY_CURRENT_USER\Software\Microsoft\Windows\CurrentVersion\Run "75319611769193918898704537500611"
HKEY_CURRENT_USER\Software\Microsoft\Windows\CurrentVersion\Run "ieupdate"

View blog reactions

03/07/2008

Convert a video to your iPod or iPhone

How to Convert a video to your iPod or iPhone

ipod_image
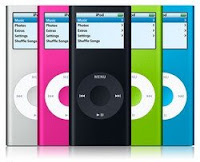
A feature of the iPod Touch and the iPhone for Apple was able to view a video in a resolution of 480 by 320 pixels. The transfer is done easily via iTunes and the reading is a simple child. But it is a step that requires more knowledge than all others combined: the conversion of the video. And also grabbing of your favourite YouTube videos to PC.

Indeed, the player and the Apple phone will not accept any video. They can read files encoded in MPEG4 and MPEG4 H.264 in a maximum resolution 640 x 480 pixels at 30 frames per second and with a maximum bitrate of 1.5 Mb / s for the MPEG4 H.264 and 2 , 5 Mb / s in the case of MPEG4. Do not adhere to these constraints will lead to iTunes refuse to integrate the movie into your device. We therefore propose to show you how to transform your videos into a format adapted to the iPod like the phone with the software Videora iPod Converter.

Step 1: Downloading and installing

1. Download Videora iPod Converter : Here
2. Start the installation of the software.
3. Check on "Run Videora iPod Converter" to launch the application.

Please note that the formats accepted by this software are many, the mkv mpg via flv. Once the software is launched, do not be frightened by the many advertisements appearing on this software and carefully follow the following.

Step 2: System and the first launch

1. Select the player that fits your model.
2. Select as a video source on your hard drive by clicking on "Video File".
3. Opt for the normal mode if you want to avoid the most complex stages.

Converting a DVD requires a few additional steps that will not be discussed here. The ability to encode videos from the Internet is restricted to users but works perfectly from sites such as Youtube (see box at the end of page). There will be limited by the conversion of a video on your hard drive.

Step 3: Definition of source and destination

1. Start by selecting the file to convert via the button "Select File."
2. Specify then the destination directory the line "Output Directory".
3. Finally Click on "Next" in the main window to move to the next step.

This procedure is the simplest proposed Videora iPod Converter. If you want to have more leeway on the various options for conversion, you can opt for the "Power mode" or pass through the tab "Settings".

Step 4: Choice of options

1. Indicate the title you want to give your video.
2. Specify then the different quality options for your movie.
3. Finally Click on "Start converting" to start the process.

The various options that you must enter a well-known influence on the video size, quality course, but also the time taken by your computer to make the conversion. By varying the different settings, you can observe their effects on blue gauges that represent these characteristics of time (Speed), quality and size.

Step 5: Conversion and transfer
1. Click on "View conversion progress" to control the process.
2. Wait time of conversion and the addition of video to your iTunes library.
3. Synchronize your iPod or iPhone to load the video.

If the time of conversion is particularly long, you can choose to let the work be done during the night and turn off the computer when done. Check this box, "Shutdown when completed." Similarly, nothing prevents you from creating multiple tasks simultaneously conversion, treatment with queue being provided in this software.

The videos on Youtube on your iPod?


One of the particularities of Videora iPod Converter is to simply copy the video Youtube to your iPod or iPhone.For that, go to the tab "Online Video" or choose this option starts. Then click on the link to Youtube and look for the video you want to copy. Once found, then use the "Download Video" above the logo Youtube then return to the tab "Convert" then "Progress" to observe the evolution of the conversion of selected video. It seems, however, that Youtube videos are now protected against this type of downloading, but the creators of Videora iPod Converter probably return the charge to circumvent this protection and continue to offer users this feature.

View blog reactions

08/05/2008

How To use PC internet on Nokia via Bluetooth

With this tutorial, you will learn how to make your Symbian Series 60 (WAP 2.0) phone use your pc's internet connection via bluetooth. The advantages of this are that when your phone is within bluetooth range of your computer, you will have FREE and UNLIMITED mobile internet!!

REQUIREMENTS

1) a Symbian Series 60 phone with WAP 2.0 (Nokia 6600 or 7610 *only* for now) 2) an Internet Router (LAN) 3) Patience! 4) Follow this tutorial in its order GIVEN because some parts can only be done before others and vice versa.

What to do on your phone

1) Download the latest Nokia PC Suite for your phone. For the 6600, it has its own PC Suite which you can find on Nokia.com. For the 7610, download its own PC Suite (whatever it is) from the 7610
2) In your PC Suite, make a new profile/access point/WAP Connection profile (called Access Point in your phone). In the new profile here are the settings that you should change. The rest don't touch.
Set the name to "Bt" (no quotation marks). The capitilization of the B is necessary.
3) The Data Bearer should be GSM Data/HSCSD
4) The Dial-up number must be something, but it can be anything except nothing (make sure you put something in the field)
5) The User name must be a user name on your computer when you log in.
6) The password is the password of your username that you entered for the username. If the username has no password, MAKE AND ACTIVATE ONE (it's mandatory for this) via Control Panel --> User Accounts.
7) Authentication: Normal
8) Use PPP Compression: YES
9) Use Login Script: YES
10) Login Script. This is why you are using PC Suite and not just entering this into your phone directly, the script is complicated. Copy this DIRECTLY and make sure it's IDENTICAL to this script in your profile:
Code:
CHARMAP [windows-1252]
LOOP 10
{
SEND "CLIENT"+<0x0d>
WAIT 3
{
"SERVER" OK
}
}
EXIT KErrNoAnswer$

OK:
EXIT
11) Save this new Remote Connection (Access point) to your phone via PC Suite.
12) Download gnubox.sis from here
13) Install gnubox into your phone.

You are ALMOST done with your phone settings :)... the last settings will have to be done AFTER the rest of these instructions.

What to do on your PC

1) Make sure you deactivate the Bluetooth COM Port that mRouter is using to connect to your phone. OR, just make sure that you stop Connection Manager from using your phone through bluetooth period- just uncheck bluetooth as a connection option there.
2) Go to Control Panel --> Phone and Modem Options --> Modems --> New. On the first page of the modem installation, CHECK "I will select from a list".
3) Choose "Communications cable between 2 Computers" from the "(Standard Modem Types)" list.
4) Select the COM Port to be the COM Port that your phone connects to via Bluetooth Serial Port.
5) Once you're done and brought back to your modems list, highlight the new modem, click "Properties", and make sure your modem is at the highest speed: 115200 bytes/second.
6) Now, go to Control Panel --> Network Connections. Select "Create a New Connection" from the left margin (it'll start up a wizard).
7) Choose "Set up an Advanced Connection", then "Next".
8) Choose "Accept incoming connections", then "Next".
9) Check the “Communications cable between two computers” modem that you creating, then "Next".
10) Select "Do not allow virtual private connections", then "Next".
11) Check the username that you select in your phone setup step 5, then click "Next".
12) Make sure all options are checked in the list, then highlight "Internet Protocall TCP/IP" and then click "Properties". Click "Specify TCP/IP Addresses" and input this range:
From: 10.0.2.2 To: 10.0.2.254. Now click OK, then Next, and then Finish the wizard. You will return to Network Connections.
13) If you have a connection called "Bluetooth Network" in Network Connections, right-click on it and click "Disable". It should be greyed out now.
14) Run cmd.exe which is found in Start Menu --> Programs/All Programs --> Accessories --> Command Prompt.
15) Enter these commands into cmd.exe after reading 15b.
Code:
netsh router ip nat install
netsh router ip nat add interface "YOUR LAN INTERFACE NAME OR NETWORK BRIDGE NAME" full
netsh router ip nat add interface Internal private
15b) -Wait for cmd.exe to load that command and then let you enter a new command. Do the same for the all of the commands.
-Try entering every LAN connection name IN the quotation marks and including them in the command in Network Connections until cmd.exe actually executes the command. The name that I found out that I had to input was my network bridge name which is basically its title.
-Internal should be spelled in the language that your computer uses!!!!
16) Close cmd.exe and YOU ARE DONE CONFIGURING YOUR COMPUTER!!! CONGRATS. hehehe

BACK to your phone settings (you must only do this after configuring steps 1-13 in phone settings and all of the steps in the computer settings!!!)

14) Run gnubox.
15) In gnubox, go to Options --> 2box direct --> Bluetooth. Then, select your computer once Bluetooth searches and finds it.
16) Make sure your computer is on and working, you followed all of the steps shown IN THE ORDER THEY WERE GIVEN IN. Go into Web/Services --> Options --> Settings --> Default Access Point. Select your new access point/profile thingy which is "Bt".
17) YOU ARE DONE!!!!!!!!!! Simply go onto the internet on your phone now, and once you connect, your computer will make a Connection sound (it's kinda mystical-ish). You MAY get an error stating that your script is invalid, but then your phone will continue to try to connect and you will (it happened to me MANY times

View blog reactions

13/04/2008

How to Choose Anti-Spam Filter?

The damage spam brings you is huge: loss of time, bandwidth and money, risk to delete a legitimate message together with junk emails. So, an anti-spam filter is not a whim but a necessity for almost all PC users who actively use email.

What criteria should you follow to choose the right spam filtering program? What capabilities must an anti-spam tool have to filter and cut off spam mail in most effective way?

Here are the main features a good anti-spam software must have to block spam effectively:

1) it should be a standalone spam filtering tool, which checks all incoming emails on the server, detects and deletes spam messages.

2) deletion of spam without receiving it in your inbox. This way you won't download all the superfluous kilobytes into your inbox and you won't see annoying spam mail.

3) powerful antispam filters built in one program that analyze the message from "outside" and "inside": message header, message body, and message source. Flexible whitelist and blacklist easy to edit and update are also very useful as they help save much time when filtering emails. Good anti-spam software must also have the Bayesian filter in its arsenal of spam filtering tools.

4) easy and safe method to preview emails marked as spam. Inherent in antispam technology is the fact that there will be false positives and false negatives, i.e., email can be flagged as spam even though it is not actually spam and vice versa.

5) flexible spam filtering. Spam emails should be moved to a separate folder. A good spam filtering software should provide the ability to recover an email if it was accidentally marked as spam and trashed.

Simply put, an anti-spam program must be a standalone, easy-to-use software supplied with powerful anti-spam filters able to be adjusted by every user for his personal needs. Now with all that said above you can choose the right anti-spam software among all spam filtering programs available on the Internet.


Article Source: http://EzineArticles.com/?expert=Jilia_Gulevich

View blog reactions

30/01/2008

How To Upgrade Computer Memory

computer_memory
How To Upgrade Computer Memory
by: Michael Cottier


Computer memory, also known as Random Access Memory (RAM), is just like your short term memory in your brain. It stores everything you are currently working on and recently worked on. As you can see that makes it a very essential part of your PC because it stores vital information that you are using and need access too immediately. No matter what the data is, pictures, sounds or just text, if you get a good amount of memory your computer will load that data much faster and store it better.

Many people want to do a RAM upgrade there selves, but always run into the problem of figuring out which type of memory to buy and installing it. If you didn’t already know, there are many different types of RAM available on the market, and you need to get the type that corresponds with your motherboard. If you don’t know what a motherboard is, it’s the big circuit board inside of your computer that connects everything together.

First, let’s talk about the two main types of RAM that are in use today, SDRAM and DDR. SDRAM stands for Synchronous Dynamic Random Access Memory, and is the most common amongst PC’s today. Most likely your desktop computer uses this type of RAM. I use to have SDRAM, and I thought it was okay because it got the job done. I have switched though to DDR RAM, which is replacing SDRAM. The speed of DDR RAM is twice that of SDRAM, so you can imagine the difference. If your motherboard currently only has SDRAM slots, then you have no choice but to get that type of RAM. If you want to change to DDR RAM, then you have to buy a whole new motherboard and install it. To find out what RAM your computer uses just look at the instruction manual that came with it, or if it is custom built, look at the motherboard’s instruction manual.

For all you laptop and PDA owners out there, the type of RAM in your laptop or PDA is called SODIMM. Available at the same memory store you purchase your desktop computer RAM from, just a little more expensive and harder to install.

Now that you know the different types of RAM, you need to know where to buy it from and how to install it. To buy it, I suggest your local computer store because there will be a person there to help you and they will make sure that you buy the correct RAM. Here’s a tip to, bring your computers instruction manual with you to the store and they will definitely know the correct type of memory you need. If you want to buy online, then NewEgg.com and TigerDirect.com are two great online computer stores that will deliver your RAM into your mail box.

And last but not least, you need to install your new RAM. Believe it or not this is the easy part. First shut down and unplug everything from your computer and then remove your computer’s case cover, to gain access to the motherboard inside. Once you can clearly see the motherboard, locate your RAM. You should know what it looks like since you just bought some and you can look at that. When you find it, you will notice a latch connected to the slot that holds it on each end. Push down both of the latches to unhook them, and then gently pull the RAM stick out. It should slide out with ease, but if it doesn’t, then wiggle it a little bit while pulling.

After that you just need to insert your new RAM. First count how many slots you have available for RAM and how many of them currently have RAM in it. Some times you will see 2 slots occupied and 1 open, or all three slots could be used. Either way, you have to insert your new RAM into an open slot, or if all are used then remove the oldest and least amount of RAM to clear a slot. Then gently insert your new RAM and pull the latches back up on both sides, securing your memory into place. After that just screw your case cover back on, hook your computer back up to everything and then power it back on. Your computer will automatically detect the new RAM and no further installation process is needed.

Well that is about it, I hope I have helped you. Just remember to keep your computer clean plus maintain properly, and it will live a long life.


Copyright 2006 Michael Cottier
About The Author
Michael Cottier
If you need help upgrading other parts of your computer or portable devices, then Michael Cottier can help you. Go to his website at: http://www.computer-customizing-guide.com/.

View blog reactions

Post Recent